 в
в
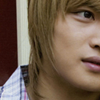
1. Prepare your base--sharpen, curves, levels, whatever. I tried to redo my coloring by looking at the final icon (since I never remember my coloring), but its obviously off. (That's also why there's no .psd file for this. :'D)
2. I used this texture for the background of my icon. I can't remember who made it, tell me if you know! I selected away the space behind Jaejoong's head using the magic wand tool and dragged the texture underneath.
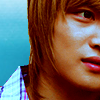
3. I brushed in the background color over his hair and shoulder with a soft brush (transparency around 30), to make it more hazy-looking.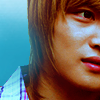
4. Finally I used this texture, again I can't remember who made it (but it was the same person that made the blue texture!). Set it to lighten or screen depending on what looks better. Add text or brushes or whatever you want, and you're done.
Other icons made this way:

№10
Страница: 1
Сообщений 1 страница 1 из 1
Поделиться12008-10-26 11:49:15
- Администратор

- Откуда: Дар
- Зарегистрирован: 2007-10-21
- Приглашений: 0
- Сообщений: 211
- Пол: Женский
- Провел на форуме:
6 часов 43 минуты - Последний визит:
2009-06-20 21:06:25
Страница: 1